How To Combine And Merge Two Word Documents
People who work mostly on MS Word frequently need to merge documents. They may need to merge multiple documents in a master document or merge multiple versions of the same document. The latter is a headache, especially if you collaborate with various people on the same document.
In such cases, you need to collate all the changes that have been made by the team. You have to keep track of all the changes that your team members perform on the document in real-time. To combine multiple documents into one, what most people do is a simple copy-paste to achieve the requirements. But it is not always intuitive.
Luckily for us, any modern version of Microsoft, including the latest version of Office, is now equipped with some exciting features that will make the task of merging documents a piece of cake. This articles provides step-by-step instructions to combine word documents into one.
Merge Multiple Documents into a Single Document
Admittedly, the quickest way to merge multiple documents into a single master document is to manually copy the other documents’ contents and paste them in the master document where the existing content is ending. This is not really the best method to merge documents. If there are many documents to merge, this process can literally take all day, which is not efficient in any way. You need to utilize the fantastic features that MS Word provides to make our lives easier. Read further to learn how you merge multiple documents easily.
Step 1
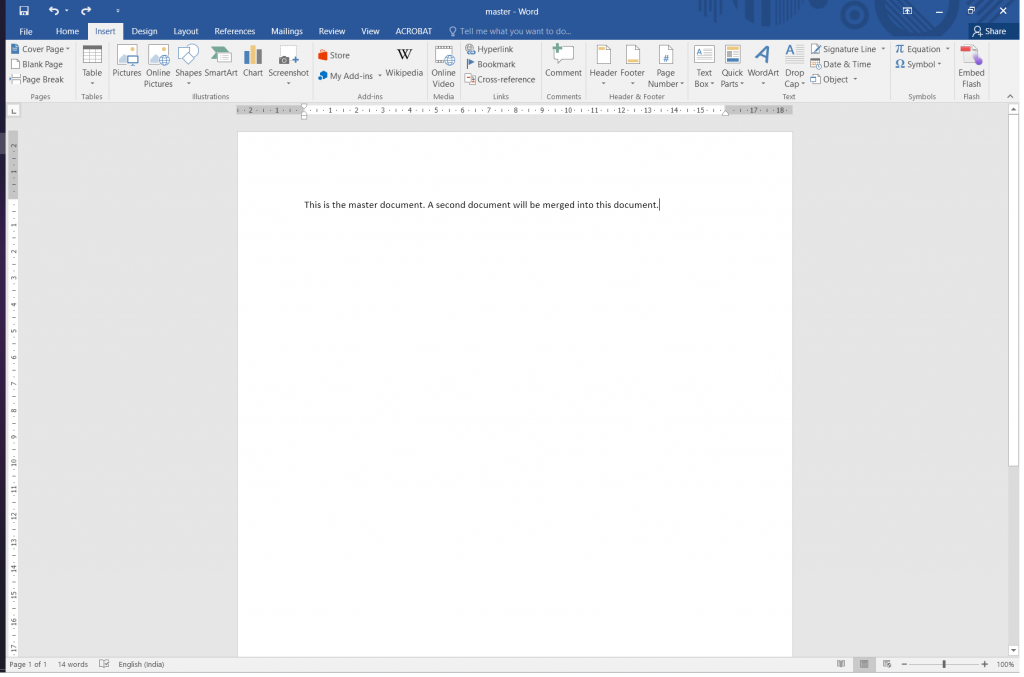
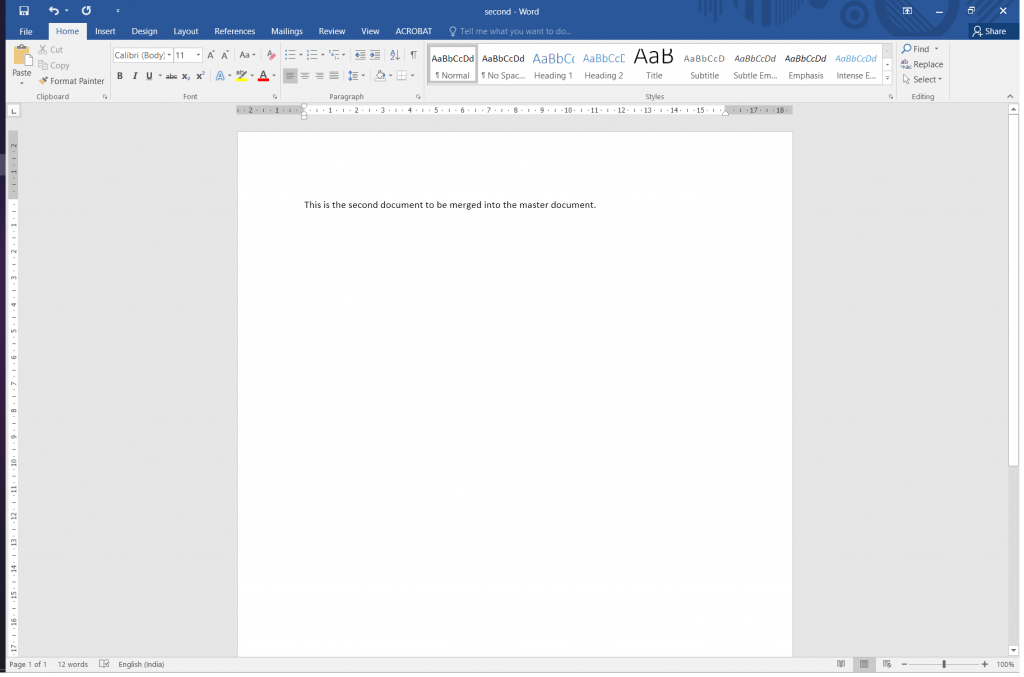
Firstly, open a new Word document or an existing one. This will be your master document that will have the merged contents. From the Ribbon bar, navigate to the Insert tab.
Step 2
Click on the Insert tab. The insert tab will open, which will have a set of options to choose from.
Step 3
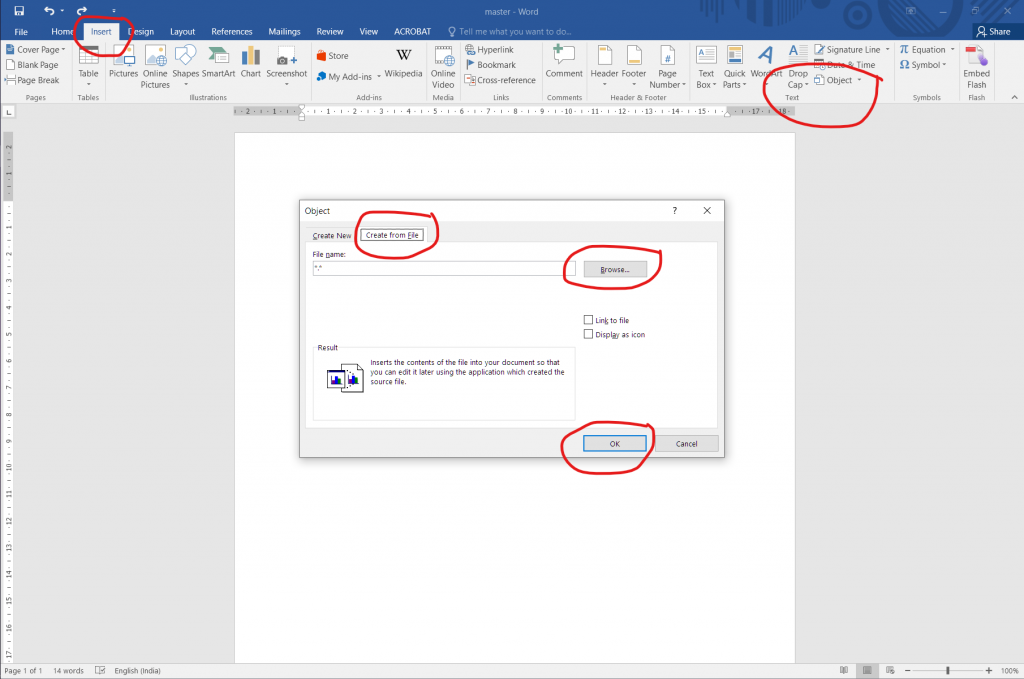
Look for the option Object under the Text section. Once you locate the Object, click on it.
Step 4
Depending on the Microsoft Office version, either a dropdown will appear in the Object dialog or it will have multiple tabs. If a dropdown appears, select Text from File or in case of a tabbed dialog select Create From File.
Step 5
Click on the Browse button or on Insert File to locate the document that you want to merge first. Select it and click the Insert or OK button to add the document.
Step 6
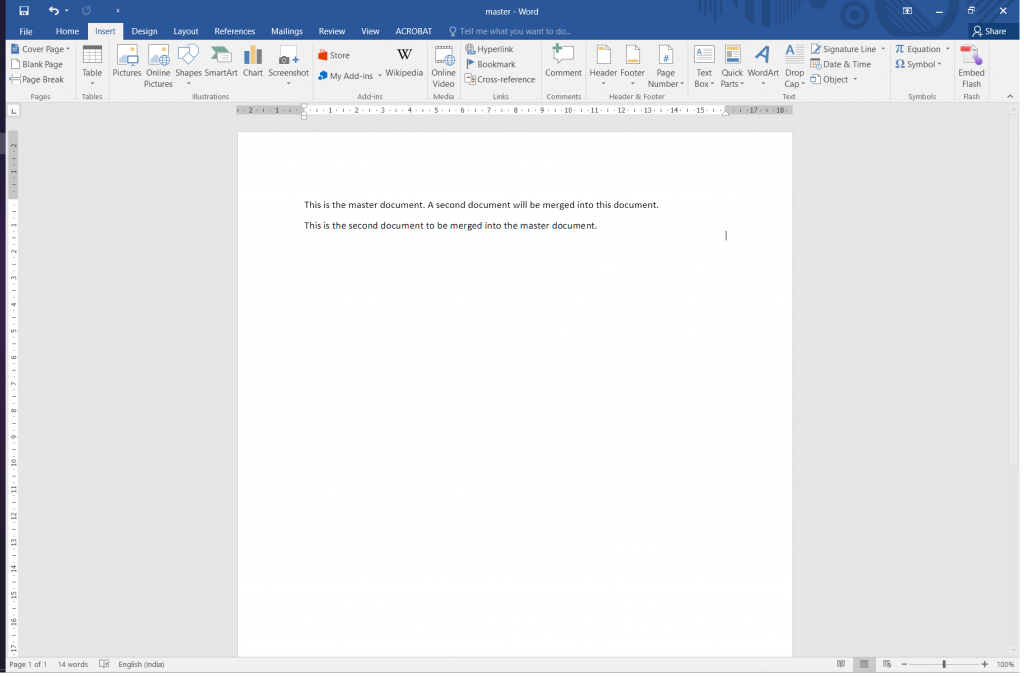
The content of this document is now combined with the content of the master document. The new content is appended, where the content of the master document ends. If it is a new document, the content of the second document will start from the beginning.
You can merge as many documents as you like. But you need to be careful about the order of the documents. To be sure, the documents can be named appropriately in sequence. That way, there is a minimum chance of error.
Merge Multiple Versions of a Document
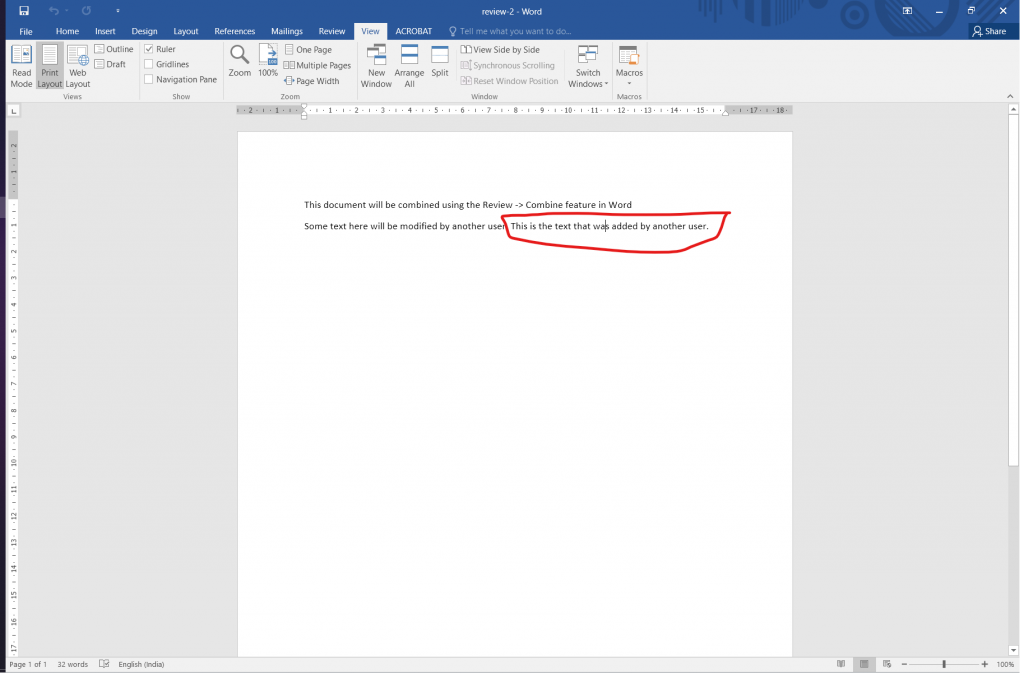
Often it happens that you have sent your document to your team members and seniors for suggestions and corrections. When every member sends it back with their inputs, it becomes difficult to handle all the versions of the same file. A few of them may even get lost. The efficient way to handle them is to merge the versions and form one document with all the inputs and corrections.
Fortunately, there are some features that MS Word is equipped with, which we can make use of. The rest of the article highlights how to collate all the inputs and ideas into one document.
Step 1
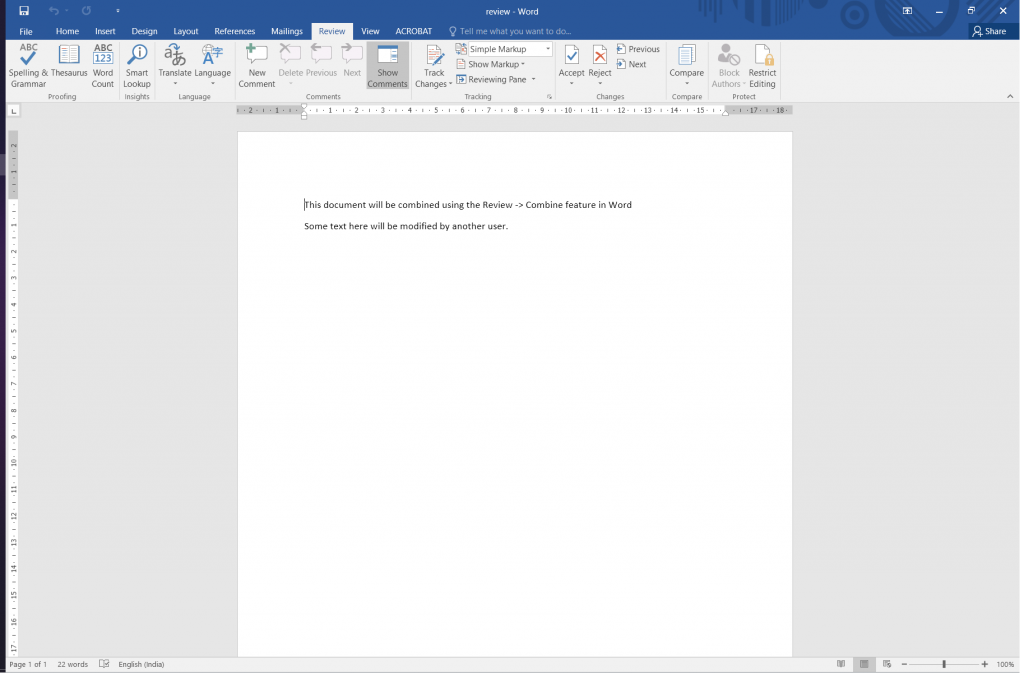
Open the master document where you want to collate all the revisions. Locate the ‘Review’ tab on the Ribbon bar. Click on the Review tab.
Step 2
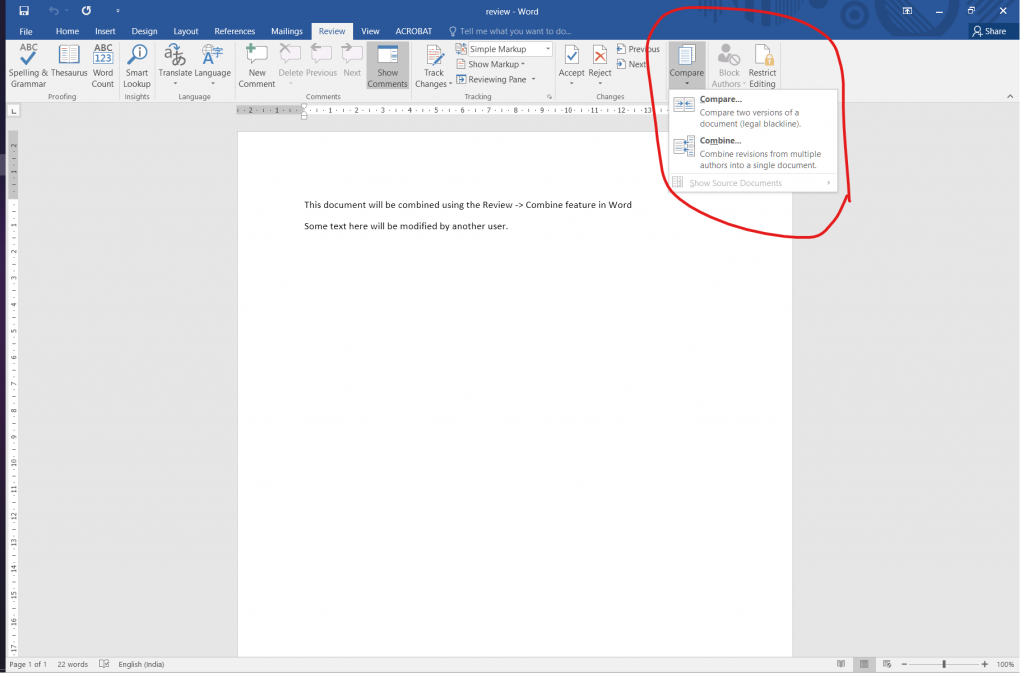
The Review tab displays a range of options. Navigate to the Compare option that is under the Compare section itself. Click on it.
Step 3
On clicking on the Compare button, a dropdown menu appears. You will find the option Combine in the dropdown menu.
Step 4
Locate the option and click on it.
Step 5
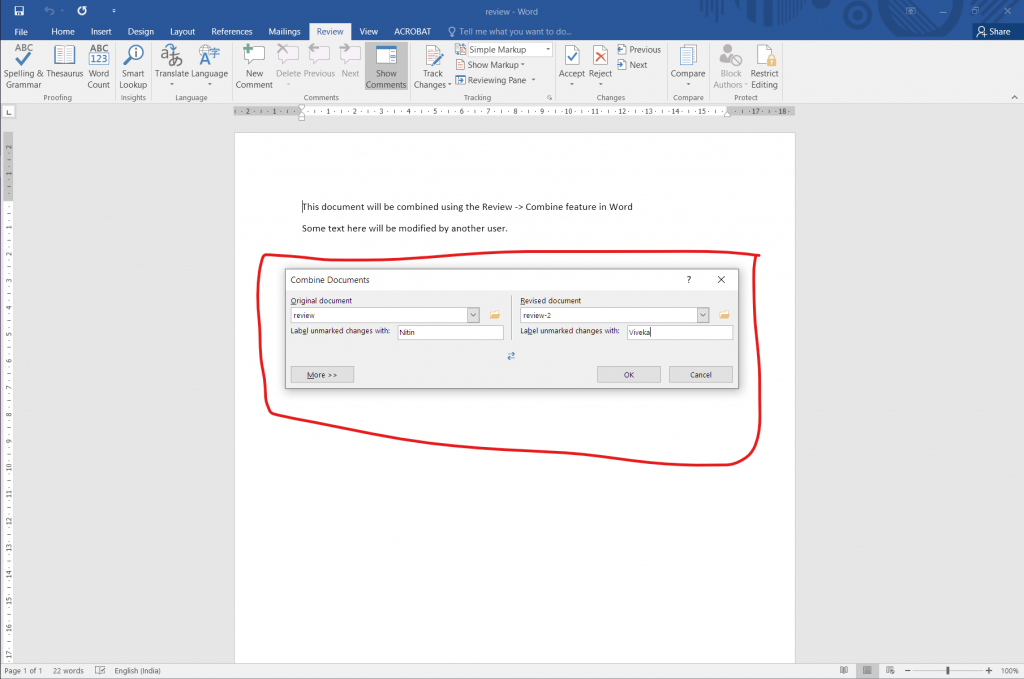
After clicking on the Combine option, a popup window appears with the window title Combine Documents. This popup window allows you to choose the Original as well as the Revised Document.
Step 6
For the original document, click on the downward arrow. Find and select the doc you originally had sent for review.
Step 7
In case you need to navigate to the folder location, click on the folder icon beside the down arrow and browse to the location you need. The original document should be the one without any modifications.
Step 8
Under the Revised document, choose the doc whose contents you want to compare and merge. Here also, click on the down arrow and select the document. If you need to navigate to the folder location, click on the folder icon beside the down arrow and browse to the place you need.
Step 9
In the Label unmarked changes with box, you can put in the name of the person who suggested those changes.
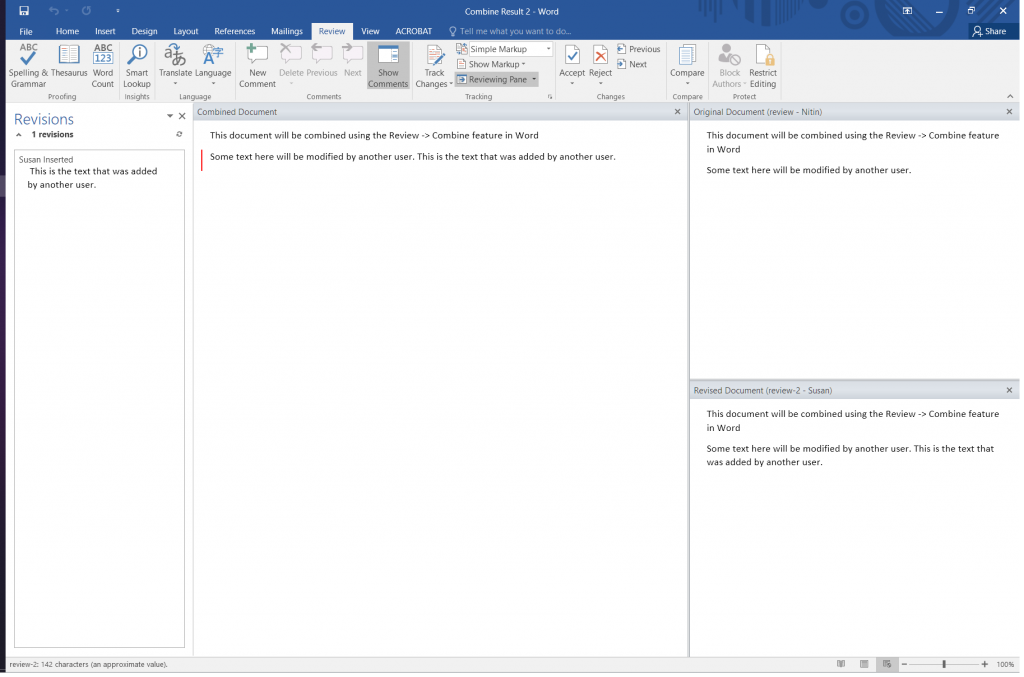
Step 10
Click on the More button to get more options to combine the documents. You can opt for the options Original document or revised document or a new document. If you want to create a new document that will have the merged contents, click on the ‘New Document’ radio button and then click OK.
Step 11
On clicking OK, a new document opens, containing the original content and the copy that you merged with it.
If you need to merge multiple documents, follow the same steps, and when you have to upload the original document, upload the previously merged document.
Different Versions Of Microsoft Word
Here is a quick overview of all the different editions of MS Word that Microsoft has released over the years. Launched on 25th October 1983 under the name “Multi-Tool Word,” Microsoft Word has become the most widely used and popular word processing software in the world today. It was developed by former Xerox programmers to be used on computers running on the Xenix and DOS operating systems.
Word 1.0 to Word 5.0 (1985 – 1989)
This was re-coded to work on different operating systems, including DOS and Macintosh. Besides, the name was changed to ‘Word.’. With Microsoft gradually improving the product further and releasing versions 2.0 to 5.0 over the next six years, the Windows version was released in 1989 with added features like spellcheck and word count.
Word 6.0
Released in 1993, it was compatible with operating systems like Windows, Macintosh, and DOS. It was the last version to be designed to work on DOS and the last version to be identified by a version number. This version introduced the AutoCorrect feature, which automatically corrects typing errors, and the AutoFormat feature, which allows users to format many portions of a document at once.
Word 95
As the name suggests, Word 95 was released in 1995 and was the first version developed exclusively for Windows.
Word 97
Word 97 introduced Clippit, an animated Office Assistant that helped users navigate the new toolbar and user interface.
Word 2000
It was released in March 1999 with new HTML features and the very first internet-based collaboration features and an updated version of the Office Assistant.
Word 2002 or XP
Released with Office XP in 2001, this added a significant new feature – the “Task Panes,” giving quicker information and more control over certain features that were only available in modal dialogue boxes earlier.
Word 2003
This featured additions like layout View for reading documents easily, the ability to compare documents side by side, a Research Task Pane, voice comments, and various document customization features.
Word 2007
This included a new XML-based file format and an XML data bag named Custom XML, which could be used to implement structured documents. It also featured a redesigned interface, contextual tabs, Quick Access toolbar, SmartArt, among others.
Word 2008
It included a ribbon-like feature that can be used to select page layouts and insert diagrams and images and native support for the new Office Open XML format.
Word 2010
Word 2010 introduced a host of new features such as live word count, paste preview, artistic effects, Navigation Pane with Drag & Drop, protected view, and contemporary art effects in WordArt while fixing many bugs.
Word 2013
It sported a more organized look and focused on Cloud Computing, saved documents automatically to OneDrive, added new features such as a new read mode to enable horizontal scrolling of pages and a bookmark to mark reading progress.
Word 2019
Word 2019 introduced improved digital pen features and support for Microsoft Translator, Scalable Vector Graphics, and LaTeX.
Microsoft word is a highly integrated, user-friendly interface that is continually changing and updated to keep up with the level of consumer satisfaction it has always provided.
In Conclusion
You might run into problems while merging the documents. You can open the older files using the newer version of Word and then proceed to merge it. These new features of MS Word are very convenient and save a lot of time.
Also, manually copy-pasting documents is very tedious. Using Microsoft Word’s features, you can easily compare and reconcile multiple versions of the same document. This helps you streamline the workflow.
Related Posts
- Useful shortcuts equivalents on MacBook Air with Windows 7
- How to Factory Reset a Toshiba Laptop Yourself
- How to Enable Dark Mode/Light Theme in Chrome
- Best Video Player For Windows 10 PC
- Automatically clean browser history
- Installing Windows 7 on MacBook Air
- How to Download Hotstar Videos on PC, Android, and iOS [Updated]
- How To Fix Headphones When Only One Side Works
- How To Use Keyboard Shortcuts To Apply Strikethrough Or Crossout In Word
